Making Dewdrops
An overview of the process from idea to installation

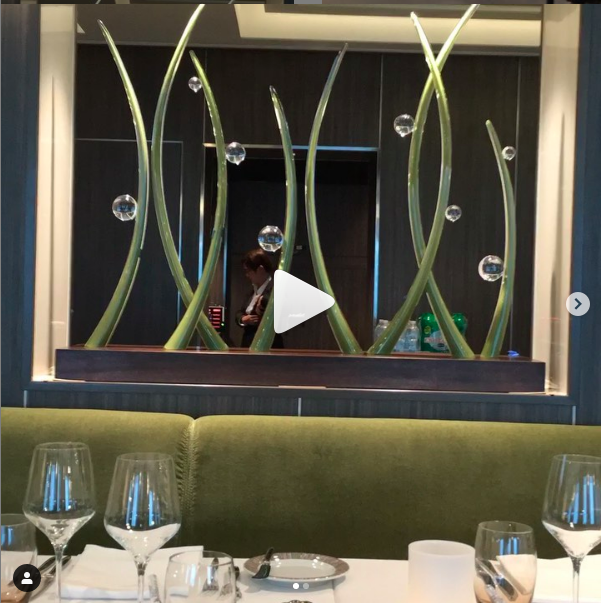
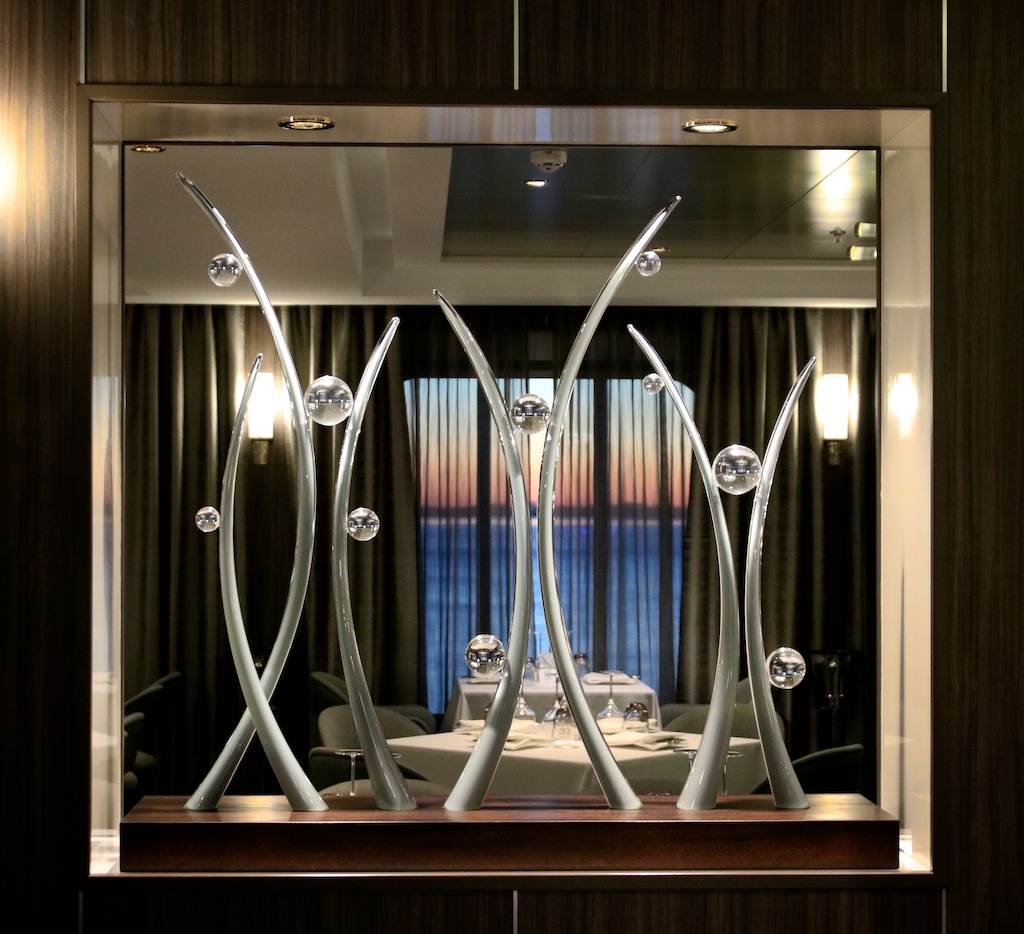
I recently installed eight sculptures titled Dewdrops in a brand new Norwegian Cruise Line ship off the north coast of Germany. This project was a perfect combination of glassblowing, design, engineering and craftsmanship and one of the most satisfying of my career thus far. The ship was in the final stages of a two years construction cycle and by the time my assistant and I went on board this past October to install these, the ship was in its last week of outfitting and scheduled to cross the Atlantic to begin service in the Caribbean. Jon Moreno (a fellow glass artist, friend and my assistant for this project) and I planned to install the sculptures while the ship was in port at Bremerhaven for six days. But to our surprise, within three hours of boarding, an unscheduled 'sea trial' was announced and we departed to cruise the North Sea off the coast of Denmark and Norway for two days before returning to Bremerhaven.
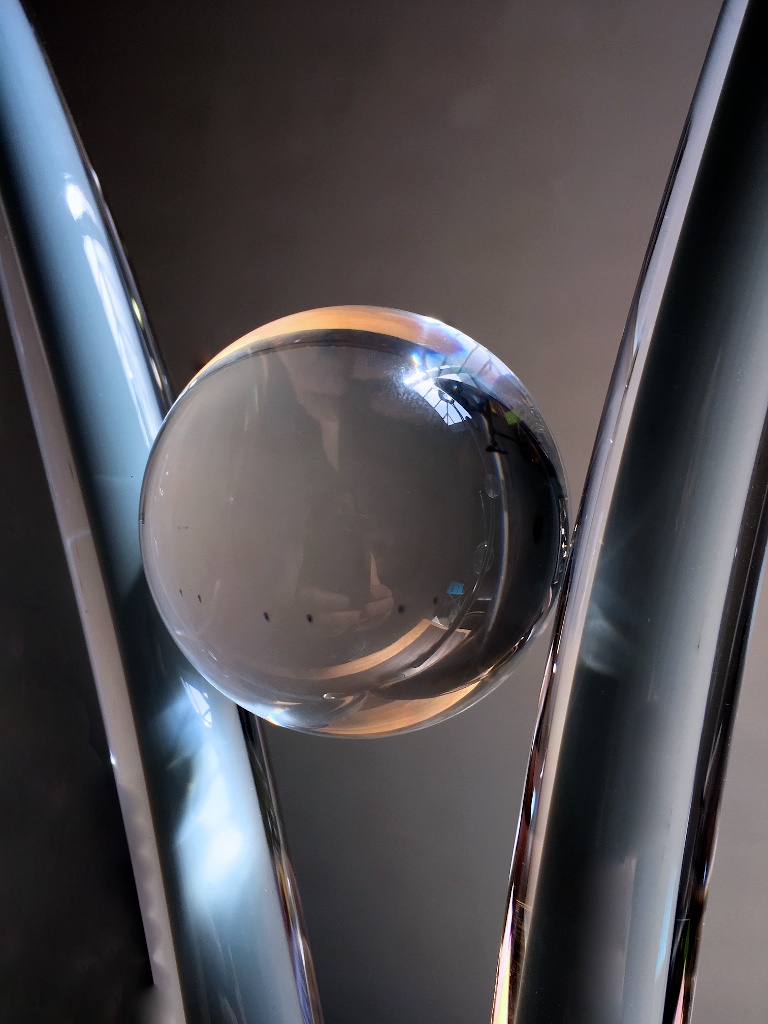
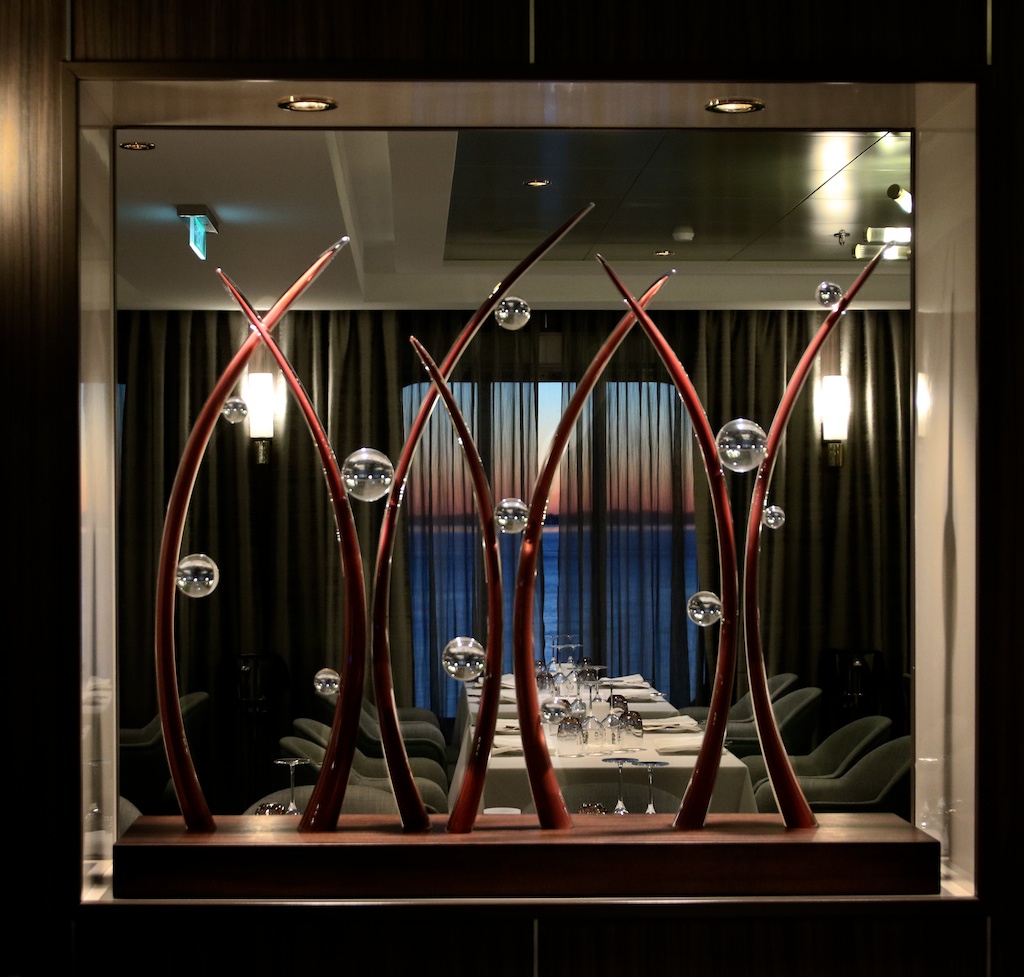
Consistent with their name, Dewdrops are sculptures comprised of elegant crescents of glass with crystal clear spheres of 'dew' clinging to them. The curved glass elements relate to each other through gentle curves and gestures through the negative space. Spheres of 'dew' in various sizes defy gravity by clinging to the glass reeds and like dew, act as lenses refracting light and offering interesting and distorted views of the surroundings. Designed in a range of earth tones, this set of Dewdrops echo a macro view of the natural world where this phenomenon of condensing water vapor occurs.
While these sculptures are primarily glass and wood, the majority of the work wasn't glassblowing. A great deal of time was spent engineering the work, determining the placement and interactions between the crescents and spheres, ensuring the glass fit flush against the base, sorting how to secure the glass to steel pins, bonding spheres to the glass crescents and designing it for safe transportation to Europe and a straightforward installation on site.
The project originated with an email in late March 2019. Final colors were approved at the end of April. Glassblowing was completed the end of June. Fabrication and bases were completed the beginning of August and they were shipped to Germany mid-August. The finished work installed on Norwegian Cruise Line's massive new ship Encore, at the end of October 2019. The work for this was sporadic throughout the duration with a couple of full-time weeks prior to shipping.
Click to link to Instagram for a short time-lapse of installation of one Dewdrops.
REQUIREMENTS
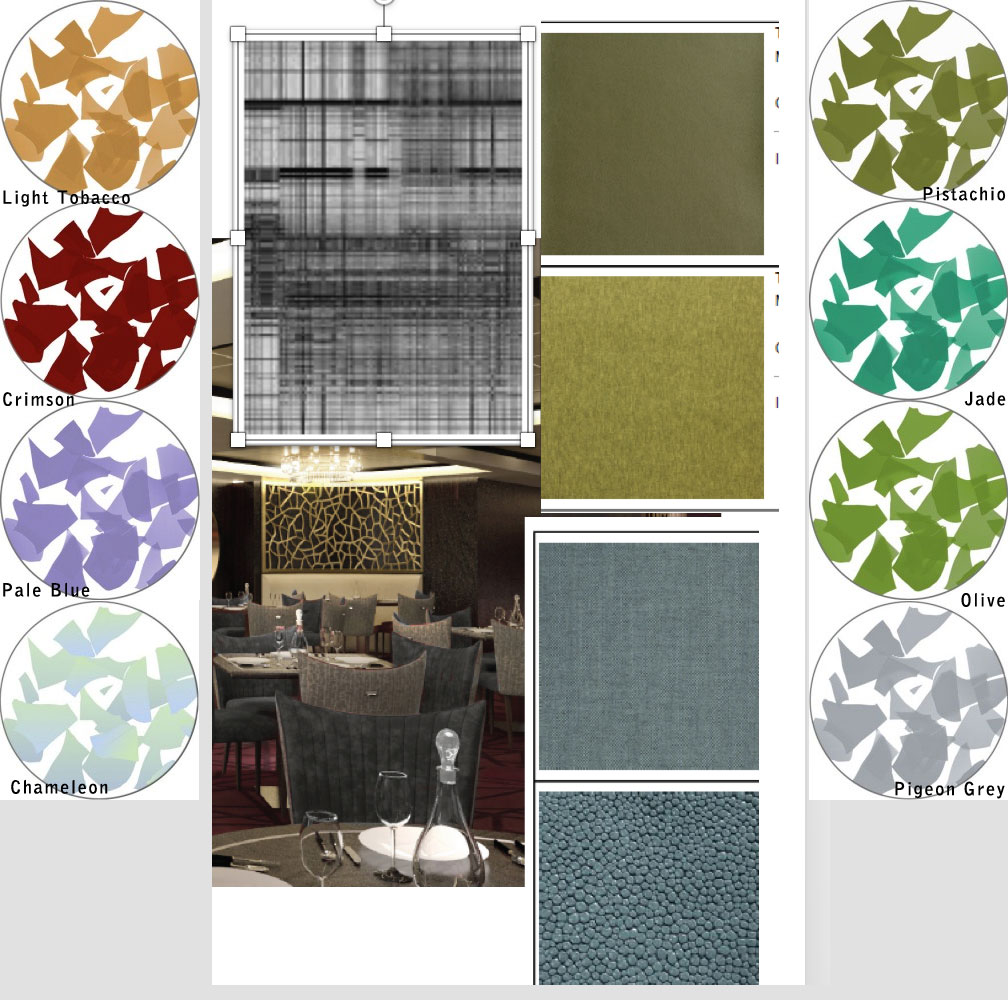
The sculptures were designed for niches that are open on both sides in a fine dining restaurant. The client provided architectural drawings and dimensions along with a color palette of earth tones designed for the space.
As much as I love the artistic freedom to designand create whatever I envision, I also enjoy the challenge of working with a client to design work that's custom to a space and satisfies a specific aesthetic. Since the first Dewdrops sculpture was a 15" tall prototype, scaling them up to four feet tall and equally wide was a fun challenge.
Since these sculptures would reside in an environment that moves, engineering them to remain secure was a constant consideration throughout design, creation and installation. With everything subjected to continual rocking, all mechanical and adhesive connections would have to withstand occasional stress in different directions.
Given all eight sculptures would have to safely be transported to Germany via freight, shipping them unassembled was the obvious choice. I carefully considered the degree and nature of the assembly I wanted to undertake on the ship, since tools and jigs for curing adhesives would be limited to what we could carry in a suitcase.
DESIGN
The origin of Dewdrops was based on some crescent forms and spheres that were leftover from a corporate commission. These crescents were in bright colors and only about 15" tall; they weren't used in the commission since they didn't quite match with other crescents I had made--perhaps they were a bit too thick, pointed, etc. When I was cleaning up after completing this commission these extra crescents all lying together on a table intrigued me. I liked how the curves interacted and I experimented with a few approaches to arranging them toghether. I decided that I liked them best vertical, with the curves intersecting and interacting. Experimenting further got me thinking about the way the crescents related to each other and the areas of visual interest or tension.
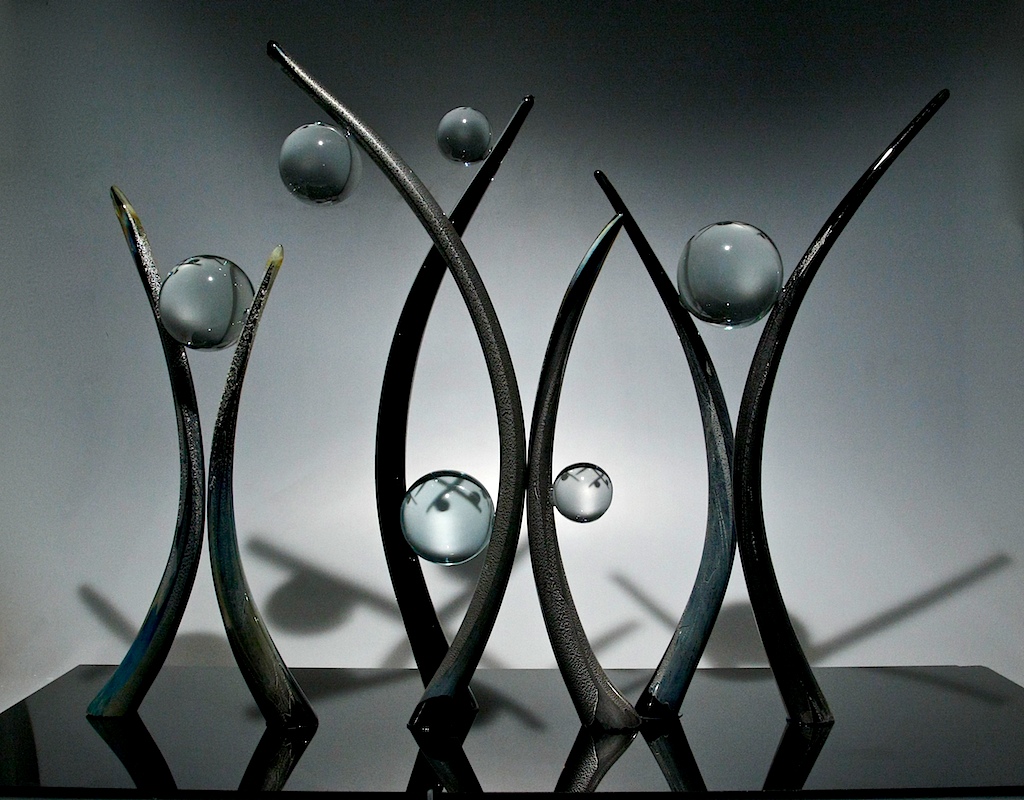
Since I also had some extra glass spheres around the studio from the commission, I started adding them to these arranged crescents. I loved the combination of these two forms, the simple silhouette, the shadows they cast, and the way the spheres gathered and projected light, as well as the wild lens for viewers to peer through. I decided to make another prototype but in colors I preferred. So I made more crescents in black glass with silver leaf and mounted these on a black glass base and the first Dewdrops was born.
When I was approached to make these in large scale (each niche was roughly 4' tall x 4' wide x 15" deep) I was excited to return to this sculpture, scale it up and refine it. I decided I wanted to make the crescents with a couple of encasement layers of clear glass over the color to provide beautiful optics and strength. I knew scaling up the glass spheres was going to make them heavy and reliably attaching them was going to be a challenge. Initially, I thought attaching them hot (with molten glass) would be the most secure, so I made a number of spheres and tested adding them to the crescents during the glassblowing process. This proved to be a poor solution as the timing was critical to add the spheres before the crescents got too cool. Even worse, the spheres introduced a point of stress into the glass and when breaking the crescent off the pipe, the spheres would tend to break off as well. I also realized that I would have to determine sphere placement prior to blowing each of the pieces leaving me no flexibility if I decided I didn't like where they were placed. I considered making glass spheres separately then gluing them on once cool, but I found the glass spheres at this scale to be incredibly heavy--especially for such a small contact patch. I explored other materials for the sphere and decided to test cast acrylic because it's less than half the weight of glass, has excellent clarity and could be placed anytime after the glass was cool. The main challenge with acrylic was finding the right adhesive that could securely join them to glass without yellowing over time.
This project began with a mockup of the exact niche in which these sculptures would reside. Sketching the sculptures into the space allowed me to get a feel for the scale and desired form for the glass, spheres and bases. Color selection was next; I recommended a palette based on the color samples my client provided of other tones used in the room. I selected opaque glass colors that harmonized with the room and each other. I made paper mockups of the glass crescents so I could photograph them and manipulate them in photoshop to ensure I was happy with the curves and scale. Once I was satisfied with the design, it was time to make the glass to this specification.
GLASS PRODUCTION
Elegant, tall flowing forms at this scale are almost always best made by stretching very hot molten glass over or into a final form quickly without any re-heats (to soften and re-form). Reheats on very long/tall forms only result in uneven heat and the 'flopping banana'--glass that once hot becomes unwieldy (because it's long) and difficult to control because it's never consistently hot throughout to shape evenly. With this in mind, I experimented with various 'hot and fast' approaches to making these curved elements beautifully even and consistent. I decided to quickly draw the molten glass out into a long spear, and just before it cooled enough to harden, I would shape it around a

plywood form to achieve the final curve (pictured here with clear prototypes). This way, each glass crescent would have a consistent curve (radius). Once the color palette was finalized, I ordered my colors and used the overlay technique to coat a small glass bubble on the end of a blowpipe with a blob of the correct glass color. After heating and smoothing the colored glass bubble, we gathered molten clear glass over it twice, encasing the color with thick clear glass. Blowing the interior bubble evenly and using a
folded up pad of wet newspaper to shape the glass into a cone was the the setup to pull the molten cone into a spear. Just before pulling the spear, I picked the tip of the glass with shears, pointing the bubble up further and created a small handle of glass to grab for the next step. After heating this pointed bubble until it was very hot and soft in the reheating furnace, I then quickly exited the furnace and attached the blowpipe to a rope connected to a pulley attached to the ceiling. With my assistant holding his end of the rope, he pulled the pipe vertically toward the ceiling. Then using a gripping/cutting tool called 'diamond shears' I grabbed the tab I made and stretched the glass into 3-5' in length. I used a hand torch to keep the glass warm as I stretched it.
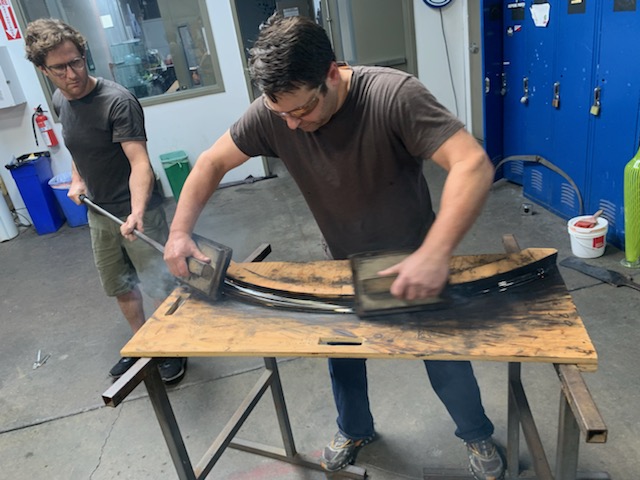
Once it was the correct length, I neatened up the tip with a torch, then my assistant carefully lowered the pipe and we quickly removed it from the pulley system. While the long spear of glass was still pliable, we set it on the plywood form and I used cork paddles to gently push the glass around the curved plywood form, creating the crescent. In the five seconds I spent bending the glass around the plywood form, it would cool enough to stiffen and hold this shape. Then we'd break the crescent off the pipe into my kevlar gloves and load it in a 950-degree kiln to cool down overnight. This all must happen quickly and seamlessly to avoid having a pulled spear that doesn't bend or a drippy noodle that won't hold the crescent shape. We did this about 80 times in six different colors over a number of days of glassblowing.
SPHERES
 Optically perfect acrylic spheres are available in a range of sizes and sourcing a hundred of them was straightforward; however, finding the correct adhesive was not. I'm familiar with specialized glass-to-glass adhesives, but joining glass to acrylic is a different challenge. The adhesive needed to join the two different materials very securely, be optically clear, not yellow over time, be viscous enough not to run out of a joint and cure at a rate that was appropriate for the pace of the work.
After researching industrial adhesives at a few different manufacturer websites I ordered five different epoxies to test. My initial test involved attaching a small acrylic sphere to a glass crescent with each of the different epoxies and seeing how difficult it was to remove after 24 hours. To prep the joint, the glass was cleaned with acetone and surface-ground with a diamond bit to give the glass 'tooth' to aid the epoxy. On the sphere I ground a concave bevel to better fit the curve of the glass, increase the surface area and expose clean acrylic for the epoxy.
 Ensuring the spheres were secured while the epoxy cured overnight also presented a challenge. I considering using a dot of UV glue for its instant curing property to hold the spheres to the glass while the epoxy cured around the joint but dismissed this approach since it meant a good percentage of the final glue joint would be occupied by the UV glue, which wasn't a reliable adhesive for this application. After much testing, I decided to use hot glue to create jigs out of craft/popsicle sticks to hold each sphere in place while the epoxy cured overnight. I quickly learned I could only rest the spheres on the craft sticks (rather than glue them), as hot glue doesn't detach from acrylic very nicely. However, hot glue adheres well to glass and detaches easily with a drop of alcohol or acetone, which I applied very carefully the next day to ensure it didn't run into the epoxy joint. After finding an epoxy that passed my tests, I left it for a couple of months (the entire timeline of the project) to ensure the joint had longevity. Since attaching the spheres was time consuming and required lots of precise jigs, I decided to attach all the spheres in my studio, except for the ones that would touch to two crescents--those I would do on the ship since it would permanently join two crescents together making them impossible to safely ship.
SECURING THE GLASS
Once installed the glass needed to be in precise orientation, flush with the base and maintain this position for years. But it also needed to be able to test-install at my studio, come apart, then permanently install on the ship.
The simplest approach seemed to be permanently anchoring steel pins inside the hollow ends of the blown glass. The part of the steel pin extending from the glass would then insert a few inches into a hole on the wood base. This way, I could test assemble them and easily take them apart for shipping. Cutting 3/8" diameter stainless steel rods into 6.5" lengths and inserting them into the 3" tall bases gave me 3.5" to extend into the glass to hold it upright. 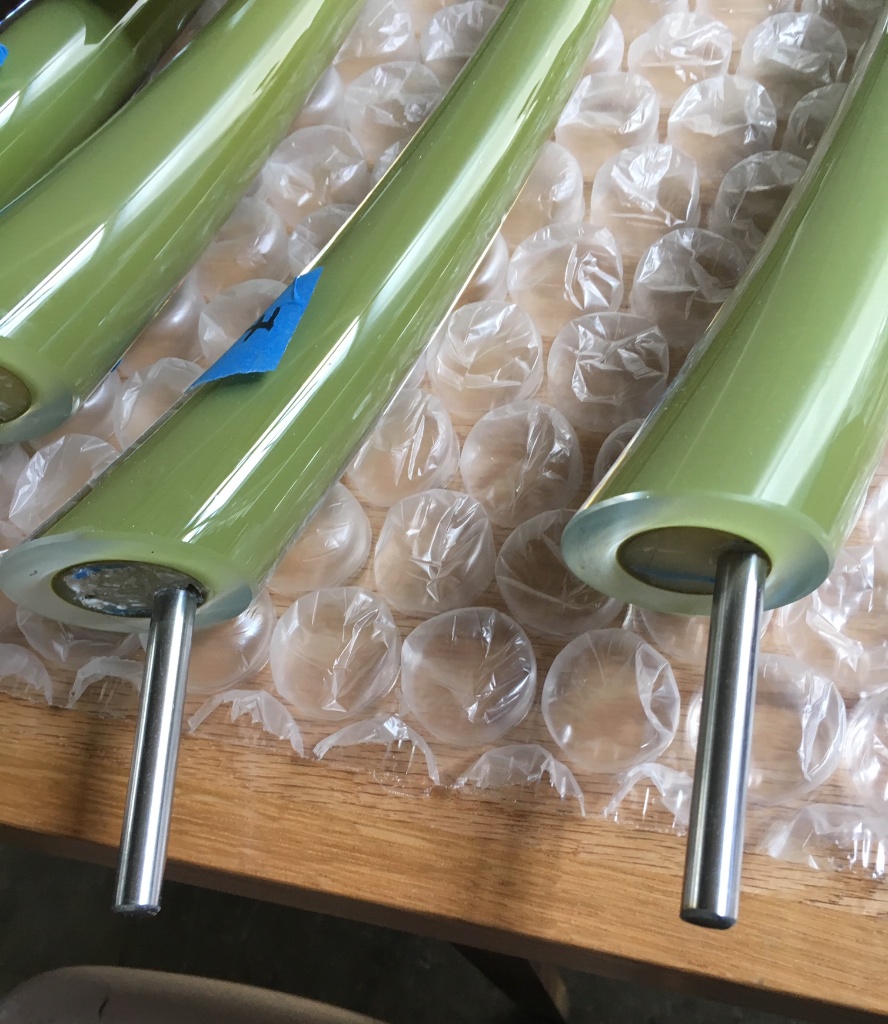
In order to simplify assembly/disassembly/re-assembly, I decided the pins would be perfectly true (perpendicular) to the wood base; but since the glass curves, this requires that the steel pins need to be bent a bit before inserting into each piece of glass. After arranging all the glass crescents flat on a piece of cardboard that represented the base, I drew a line on the bottom of each piece of glass to indicate the angle the steel rods needed to be bent to follow the angle of the glass. Before epoxying the pins into the glass, the glass had to be ground to the right angle so that when everything came together the glass would be perfectly flush to the base.
Wood base mockups were drilled, pins inserted, epoxy squirted into the void in the hollow of the glass and the glass lowered onto the pin and left overnight for the epoxy to set. I used mock ups of the bases for all of this assembly since the real bases were being assembled concurrently and I wanted to make sure that any drips, bumps, scratches, etc. would happen to mockup bases rather than the real, perfectly-finished ones. Determining the correct epoxy for securing the steel pins also required some research as most epoxy is too runny and would drip out of the glass before it could harden. In my research for viscus structural epoxy I discovered a 'thickened' marine epoxy the consistency of frosting what would stay in the void and hold the pin. Unfortunately, this epoxy shrinks a hair as it cures which would occasionally create a small stress crack in the glass. To avoid this, before applying the epoxy I painted two stripes of oil inside the glass in order to prevent the epoxy from attaching to the entire interior, reducing the stress but still securing the glass. This seemed to greatly reduce cracking.
BASES
My aesthetic for the bases was something warm and organic that was strong enough to hold the pins long-term and didn't distract or visually compete from the glass. I wanted it to harmonize with the interior of the restaurant but not blend into the decor. I decided on a tight-grained mahogany, stained and sealed in a shade of dark espresso. A fine-grained wood like mahogany provides the warmth of wood but doesn't risk competing with the glass the way I suspected a more prominent looping grain like oak would. A dark stain made the wood recede visually and contrast the glass. A fine woodworker friend fabricated these with a mahogany veneer laminated to a core of birch plywood for strength and stability from warping. They are heavy and dense.
TEST ASSEMBLY
To ensure everything was ready to go, I test assembled all the sculptures in my studio with the exception of the spheres that would rest on two crescents simultaneously, since joining them would render them un-shipable. All crescents and bases received tape labels and markings that indicated their order, placement and orientation. I documented the assmbled sculptures with photos to ensure I would be able to identify what went where even if my tape labels were inadvertently removed in packing or unpacking. Test assembly was also a chance to ensure I had record of the spheres that needed to be in my kit for final assembly on-site.
TRANSPORTATION
I was initially considering crating and packing myself, but considering the scale of the project I decided to use professionals who could complete it in the fraction of the time it would take me to do it. I hired Connect Art, a San Francisco-based art handler who regularly moves museum shows and high-end collections. They built sturdy crates and packed the glass beautifully using alternating layers of foam with custom cut-outs curved for each crescent. I included spare glass crescents in every color just in case I needed to replace some glass on-site. After unpacking the crates, I appreciated the amazing work Connect Art did to keep these safe and was a bit bummed all this beautiful custom packing was now headed to the trash.
INSTALLATION KIT
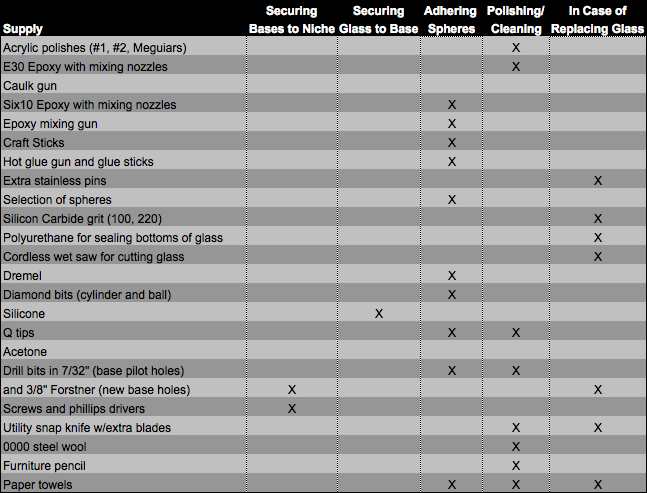
Since my needs were specialized and I knew I wouldn't have access to tools, I planned a comprehensive installation kit. Most of the installation process was easy to anticipate since I had already assembled the sculptures in my studio, but I spent much of my insomnia prior to the trip anticipating all the potential disasters I might encounter on-site and brainstorming the tools and supplies I'd need for a fix. With this installation kit I was prepared for everything going perfectly or replacing things as simple as broken-off spheres and scratched bases all the way to replacing an entire glass crescent (I ended up replacing one that showed a tiny stress crack). It was a balancing act to weigh the hassle of bringing a tool against the risk of needing it but not having it. Following is a full list of everything that was in my kit; I used almost everything.
ON SITE INSTALLATION
Our journey to the ship took Jon Moreno (my assistant) and I from San Francisco to Frankfurt, then a train to Bremen, then another train to Bremerhaven, the port city where the ship was docked. A short taxi ride and a lot of security screening and we were boarding a staggeringly
 large cruise ship. At almost 1,100 feet long, 150 feet wide and 17 decks tall the scale of this ship blew my mind. Not surprisingly, I spent a decent percentage of time on board being lost. After finding our staterooms we located the crates containing the sculptures adjacent to the restaurant that would be receiving them. Upon opening the crate I was delighted to see the packing was impeccable and everything was in perfect condition; we were relieved and could turn in knowing things were likely to go smoothly.
The next morning Jon and I unloaded and organized all the glass and bases in a staging area in the restaurant. After walking the space and deciding the order of the eight sculptures in the niches, we began installation. While I had planned to drive screws into the bases from underneath the niches, there was no access available so we used epoxy to secure the bases to the floor of the niches. These cured overnight with jigs to prevent them from shifting with the motions of the ship. The next day all glass was placed in the bases and notes were taken about any extra work each sculpture required; from replacing a sphere (that I had accidentally knocked off) to replacing a crescent that showed a small stress crack from epoxy. After all the glass was in bases we began adding the additional spheres; hot-gluing the craft-stick jigs in place for support, grinding the spheres and glass and applying the epoxy. This also required overnight to cure. The following day was mostly removal of all the jigs, cleanup of all epoxy joints, a final clean on glass and photography.
During the installation the ship was in the final stages of preparation prior to formally launching so there were likely close to a thousand technicians on board addressing all the systems that needed final work, testing or fine-tuning so the ship was a very busy place. Everyone ate meals in a large cafeteria with a dozen different nicely-done food stations occupying most of the 16th deck so there were fantastic views to be had while dining. The ship was very well-appointed with 20 different restaurants, likely even more bars and every manner of entertainment imaginable--from laser tag to go kart racing. I can only imagine what the ship will be like filled with close to 4,000 guests.
I shot a fun time lapse video I posted to my Instagram (@davidspatchen) of Jon and I performing the majority of the steps to put one of these together. During the course of this project I sweated the details--so much so that I occasionally felt I was being too exacting and particular. But my standards are as high as my desire to avoid any drama on-site approriately motivated me to over-prepare and given how smoothly everything went, I'll do it exactly the same in future projects.
Comments
Cool. Congratulations.
Cool. Congratulations.
David,
David,
I really enjoyed reading this very informative article of the whole process of this commission! Very very cool that you explained in detail all the challenges and remedies you came up with to deal with them. I learned a few things for sure! Thanks for sharing and beautiful work!
Alex Matheson
Out of the Blue Design Studio